Structuring code

Inspector structure

Image: Showing the inspector for the boss behavior script, easily changeable values for different behaviors. (Note: the script isn’t 100% yet, but still needs checking what states we want it to use)


During the last week I’ve been kind of polishing and helping out where it was needed due to that our game is basically finished except for some smaller things here and there. This meant that I would be assisting our game designer in his work when he needed things fixed immediately or wanted to add something which was a very effective way of working for us. Except that I was mainly focusing on creating all the sprites and animations for the boss that I mentioned in the last post.

What?

What I’ll go through today though, is how I kept my code structured and following a coherrent pattern throughout the entire game, so that I would be able to easily change and rewrite code without any critical effects on the game. Also, trying to not nest code but have each script work solely by itself, but being able to use other scripts within it, without any actual need for it.


How?

The first thing for me when I started off with this project, was to learn how unity actually worked with its own structure. After I had gotten a good picture of it, I found that making as much as possible available to the designer in the inspector was to be prioritized highly. The things that I focused on here for the enemy, would for example be; the health, speed, damage and objects such as the player that it would need to be aware of. In the levelhandler that I made earlier had several states that the game could be in, in other words, I wanted the designer to be able to change and try out different states and combinations as well as throw in specific scenes to load and when as well as GUI objects on screen. There wouldn’t be any need to go into the  code, but just throw in the necessary objects and type in the values for it to work in any other way. In other words I made as much as possible public, at the same time that nothing that wasn’t valuable for the designer, wasn’t.

Also, not just making the game changeable for the designer but also for me or anyone else going into the code – the code needed a good coherrent structure. What that would include is:

  • Good naming conventions
  • Structured functions and logic
  • Common pattern throughout the entire solution
  • No magic values and non declared variables.

Good naming conventions

I wasn’t very focused on this part, since ordinarily I’m using letters before the variable names such that if it’s a parameter in a function, I’d call it p_variable. But instead I focused for the entire scripts to always have the same way of thinking, like naming a counter just used for the attack – attackCounter and a counter for an ability – abilityCounter. The preferred general structure for variables would be using the before letter for telling where it is able to be used, but also using camel casing, meaning that I would begin each new word with a capital letter except for the first one. A typical one like this would be the following: p_playerHealth.

Structured functions and logic

As soon as there is something that needs to be done or calculated I would like to use a separate function within the script but especially if any code is used more than once. Also, each functions would typically do similar things and have naming that would make it obvious what it does.

Common pattern throughout the entire solution

What I mean by this is that if someone else would go into the code, they would find similarities throughout whatever script they went into, knowing that the structure is the same and can not harm any other script by adding or removing things.

No magic values and non declared variables

One of the most important things in the way I structured things is that everything, especially game objects that the script would use, is always set to “null” at the start so that the object wouldn’t have any weird data within it. Also, checking before using the object that it is not null to prevent any errors within the program(Null checking).

Also, not using a specific function in the code, shouödn’t put the processors up to action with it, so often using bools to define whether a script is using a certain behavior or method was preferred for me, in other words disabling an entire block of code depending on whther the designer wanted it or not by just unchecking a bool box.

Why?

Why I as a programmer would like to follow a certain pattern or structure throught the game development process would be that it’s so much easier for me to write the code as a start since I know where to look since each part has the same structure or naming conventions. Also, making changes in the future is a lot easier, since the code looks similar everywhere. But one of the best parts about it is that the designer can use the structured inspector to easily try out different settings and values so that the designer wouldn’t need that much help from me during this process.

The way I did this is also a very good way to prevent any errors or glitches in the game.

Implemented a boss

bosscrosshair

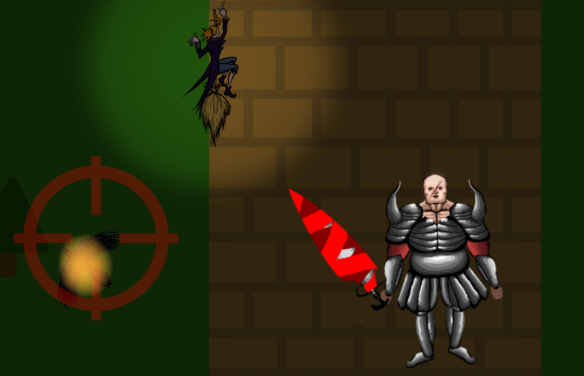
Image: Displaying the boss that has chosen his position of charging to when the load has finished.

Implemented a boss

During the last two weeks I’ve had the role of supporting the game designer in spontaneous fixes, meaning that when something needs to be done immedietely, I’ve been there to aid him. Also while doing this I focused on creating the boss for the game.

What?

The boss was supposed to be the last part of our game, to make it an extra struggle to finish it and really get that feel of an ending instead of just killing the last normal enemy and the game is over. That didn’t really feel amusing.

It was supposed to be harder which mean that it definitely needed more health but also more abilities instead of just one. Since the boss was sort of a knight or king, the boss logically would have a sword that he can hit with when in range. The boss would then instead have “special abilities” that he could use randomly within a certain interval such as shooting, charging and an area of effect attack around him.

Also, he needed several animations that I’ve worked with and is still in progress. This part I did by creating a sprite in several layers that I could move around and create the necessary sprites for an entire animation.

How?

Since the boss would have several different attacks, I chose to have a specific state for each of them. These would be the following:

  • Idle – A rest state for the boss when he used up his energy basically.
  • Chasing – Follows the player
  • Attacking – An attack in front of the player when within range that also knockbacks the player.
  • EarthQuake – An area of effect attack that charges up and then hits the player if he’s within the area of effect and also stunning the players.
  • EarthBreak(Current name, might change) – Shooting a bolt towards the player
  • Charge – Loads up and decides a destination and then charges towards the destination of the player at an increased speed until he reaches that destination that he chose.

The behavior of the boss was was suitably programmed with a local statemachine that would check for certain conditions whenever to change the state into another one. I had different functions for each state that would repeatedly be called and having it’s own counter that would keep check of whenever to leave the state.

The boss would in other words work very similar to one of the previous blog posts “Implemented a shooting enemy”. But instead he would also have a melee attack. So I made an invisible object with a collider that circulated around the boss but being inactive. Whenever i the melee state of the boss, at one point this would be syncronized to the animation so that it would look like that the sword hits the player.

The earthquake ability was also activating an object derived from the boss, and the collider of this object would be activated whenever the earthquake load had finished and if the player was in it, he would then be damaged and stunned by disabling the teleport ability and setting its speed to zero for a certain time. The same went for the earth break ability that worked similar to the earthquake when it came to the stun and speed, but instead it would instantiate a prefab of another object.

The charge ability basically saved the position of the player at the beginning of this state and instantiated a crosshair visual object at that position for the player to know where the charge would go, and when the load was finished, he moved towards this position at an increased speed and damaging the player if hit, until the boss reached the crosshair and then returning to the idle state since he needs to rest after this ability.

Why?

I find that this way of doing this was obvious for me since he would have so many different attacks and states that he could be in. It was also clear of what each part of the code did, so making changes was easy, only affecting the current states at each part.

The amount of spells was beneficial for the feel of really meeting a superior enemy, and not just a normal enemy. The effects from taking damage from the boss, ie stunned and knockbacked also increased this feel.


Implemented a shooting enemy

characterdirections

Image: 4 different directions for the enemy that would correspond to the angle of where it is looking in a pivoted angle.

What?

I got the assignment of creating an enemy for the game that would have a quite simple behavior of shooting the player.

This enemy would have a minimum range from where to shoot from, meaning that if it was too far away from the player, it would just walk towards the player until it was close enough and start shooting projectiles.

At the beginning of our process, we had planned to have the game in a top-down view, but we thought it would not have the same feeling due to that there wouldn’t be any depth of our characters. So we changed it so that it would seem that we were looking in a pivoted angle, even though it was just 2D. For me as a programmer, this would mean that I would have to change the sprites depending on where the enemy looked.

How?

Different states, different behavior.

The first thing I did, was setting up a simple state machine for the enemy where it could be in a certain state for when it was chasing the player and another one when attacking. Each state would have its own behavior such as creating projectiles going in a straight line towards the player or for the chasing state, moving towards the player. Basically, each state checked how far the player was from the enemy and switched depending on just that. The main functions such as checking the distance was called each frame as well as angle which became very important for the sprite and animation changing depending on the angle.
Sprite changing.

We decided to have four different directions for the enemy; left, right, top, down. That would mean that I had to check the angles of the enemy and then change the animation depending on that. So I retrieved the animation controller of the enemy object and used the specific variables that I had created within it. So, I would first check the enemy angle since it would always look towards the player and then set the angle variable within the animation controller to that value, let’s say an angle looking to the left and then set the corresponding bool value to, let’s say, Walking if that was the state it was in and that would mean that enemy would be displaying the walking animation in the left direction. The angle was always updated since I used 360 degrees and the animation controller would be aware of the current angle at all times, the bool for Walking or Attacking would however be changed accordingly when updating the enemy’s state.

Why?

I decided very early on that I would use a state machine system for the enemy behavior since I see its use pretty obvious for matters such as this. It also easily let me change The behavior at the same time that it makes the code very clear.

The way I did the changing between animations wasn’t very obvious for me at the start, but after a lot of testing and trying, it worked really good and became very clear at the end. I haven’t used unity before this so I’m in a huge learning curve at the moment but feel glad that I solved the issue with animation, giving it depth.

Implemented a Level Handler

levelhandlereinspector

Implemented a LevelHandler
What?
The most recent implementation that I did was a so called “Level Handler” which is an object that you pull into a game scene, that lets you decide how this entire scene should behave during gameplay.
It has the possibility to easily manage the behavior of the entire level, changing spawn positions and change scenes and the different graphical user interfaces that we might need such during pause functions, cutscenes and so on.
It also keeps track of win and lose conditions and all the variables are changeable from the inspector so that the game designer can easily change them during play testing to see what works.
A note is that after its varibles in the inspector has been assigned, it automatically handles everything for the behavior of the game.
How?
I started off by creating a simple statemachine that the current scene could be in. I used “enums” for declaring what these would be and an example could be the pause state, running the game state or a cutscene state. This would let me easily see what would happen when it is in one certain state at one time since each state had its own function. An example is that when pressing a button for the pause function, it would switch state to the “Pause State” from that only certain things would work as well as displaying a GUI element on top of the screen that you could press and also pausing the game while in this state.
The entire handler would have as many variables public as possible for being easily changed by the game designer, and also using objects that are needed for the handler such as the player object, all the different scenes as well as GUI elements appropriate for this specific scene that the handler has been added to.
Since the handler got all the specific objects needed from the inspector, I could grab the components needed within the handler to check whether a state was true such as if the health of the playerobject had been depleted or if it had been killed by the mob that constantly chases the player. These would then call for either a scene or a cutscene depending on if there is a cutscene applied to the handler or not.
Basically, the handler just uses the other game objects within a scene and checks for conditions and do stuff if something is true or false, such as changing the scene.s

Why?
At one point in our game development, we felt that we needed a clear goal instead of aiming for small parts of it. That’s where we discussed how to handle all the behavior of a scene and found that creating such a manager would suit us well.
We wanted it to have all the possibilities of changing and playtesting different win and lose conditions. Since our game is quite short, predeclaring different states was appropriate of this manager so that testing the different conditions was beneficial and easily changeable.
The game designer needed to see what works the best and just by switching one of two variables in the inspector, the entire winning state could change.
Switching scenes and levels was also a big question for us, so this manager would also switch to cutscenes, change scene and also pause the game.

What else needs to be fixed?

– Fix a state for killing a certain amount of enemies, even though it is implemented, it recently got some bug.
– Being able to manager the other managers such as the enemymanager, depending on game state(Though this might be included in an upcoming “Event Handler”

5SD064 Implemented a spawn manager

spawnmanager

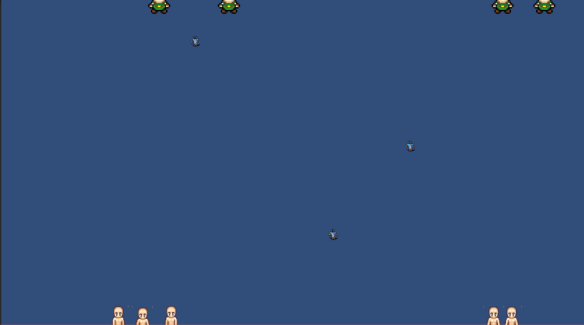
ImageText: Showing some “temporary” enemies, spawned with the spawnmanager within certain boundaries.

The previous week, my sprint partly consisted of developing an enemy as well as an enemy manager which would have the ability to spawn a certain type of enemy depending on certain factors. 

What?

The spawn manager was supposed to give the designer an ability to spawn whatever object that he wanted, depending on time as well as randomness at different positions, such as within two positions on the x axis as well as a fixed y position. Also, it was supposed to keep track of the amount of spawned enemies and keep the amount of enemies currently alive at a flexible maximum.

How?

At the start we discussed in the group what we would need to include for the spawn manager to fulfill as much as possible from the start, allowing us to use it for as much as possible when it comes to spawning things on the screen. What came to my mind at that point was basically to allow the spawnmanager to be enabled or disabled easily throughout other files, i.e making it public, as well as the rest of the variables. Since we were going to use it, basically the important variables such as positions, random factors etc. were made public so that the game designer would easily be able to change and try-test it later with less effort, no coding would be needed.

The spawnmanager follows a hierarchy from which the different variables check further on with true or false statements, coming to a point where something spawns in the end depending on the checked boxes and values from the inspector. I also found it suitable for the designer to be able to maintain a maximum amount on enemies on screen, not to overload something, not just incase a value was forgotten, but there really should be a maximum, if we want. So I checked the amount of created enemies with the certain tag that we created, since one spawnmanager would hold only one enemy object and then check how many of them are alive, if the maximum cap is full, the manager is stopped until an enemy is dead and also haven’t reached the amount of total maximum spawns.

Why?

The manager would have a lot of public variables, in other words, they are shown in the inspector. Why I chose to do this was both for development where we would be able to see how the values change during testing and so on, but also easily allowing to change the values from outside the game. The designer can easily change the values from the inspector and see its differences when played, but also it’s possible to change them easily from other places. The order of values was supposed to follow the code structure, in other words changing something would affect the next one in the hierarchy but that is still in progress, but really doesn’t matter for the rest of the code since it’s fully functional at the current state of our game progress.

The reasoning behind my decision on making such an hierarchy of the values and statements, mainly aiming towards the fact that so many different factors would change how things would spawn. In other words, what order these things would happen would need to be well thought through before coding it and I didn’t really see any other way at that moment than creating a hierarchy in the most logical order.

Also, unity handles objects very well by being able to destroy objects non dependant of outside things except itself, but by keeping track of the objects created by tag, very easily the manager can keep track of the amount of enemies alive and also in future cause, perhaps call for functions on a certain object being affected by something, such as an ignite of the player which might be common for every object.